Halo semuanya! Berjumpa dengan Miniblog dari Inzaghi's Blog! Kali ini kita akan membuat Program Mengontrol LED Sederhana di dalam ESP32 menggunakan Arduino IDE dengan HTML (Web Server).
Berikut ini adalah Program Mengontrol LED Sederhana di dalam ESP32 menggunakan Arduino IDE dengan HTML (Web Server).
Inilah Alat dan Bahan yang harus disiapkan :
- ESP32
- Kabel USB
1. Tampilan Sederhana (Hanya HTML)
Pertama, bukalah Arduino IDE dan inilah Kode Programnya :
#include <WiFi.h>const char* ssid = "Nama Wi-Fi Anda";const char* password = "Password Wi-Fi Anda";WiFiServer server(80);String currentLine = ""; // Define currentLine as a Stringvoid setup() {Serial.begin(115200);pinMode(2, OUTPUT);Serial.print("Connecting to ");Serial.println(ssid);WiFi.begin(ssid, password);while (WiFi.status() != WL_CONNECTED) {delay(500);Serial.print(".");}Serial.println("\nConnected");Serial.print("IP Address: ");Serial.println(WiFi.localIP());server.begin();}void loop() {WiFiClient client = server.available(); // Check if there is a client connectedif (client) {Serial.println("New Client Connected");currentLine = ""; // Clear the current line before starting to read from the clientwhile (client.connected()) {if (client.available()) {char c = client.read(); // Read the next character from the clientSerial.write(c);if (c == '\n') {if (currentLine.length() == 0) {// Send an HTML responseclient.println("HTTP/1.1 200 OK");client.println("Content-Type: text/html");client.println("Connection: close");client.println();client.println("<!DOCTYPE HTML>");client.println("<html>");client.println("<h1>Control LED Link on ESP32</h1>");client.println("<a>LED pin 2 Button :</a>");client.println("<br>");client.println("<a href=\"/H\">Turn ON</a> <br>");client.println("<a href=\"/L\">Turn OFF</a> <br>");client.println("</html>");break;} else {currentLine = ""; // Clear the current line for the next request}} else if (c != '\r') {currentLine += c;}// Check if the client has requested to turn the LED ONif (currentLine.endsWith("GET /H")) {digitalWrite(2, HIGH);}// Check if the client has requested to turn the LED OFFif (currentLine.endsWith("GET /L")) {digitalWrite(2, LOW);}}}// Close the connectionclient.stop();Serial.println("Client Disconnected");}}
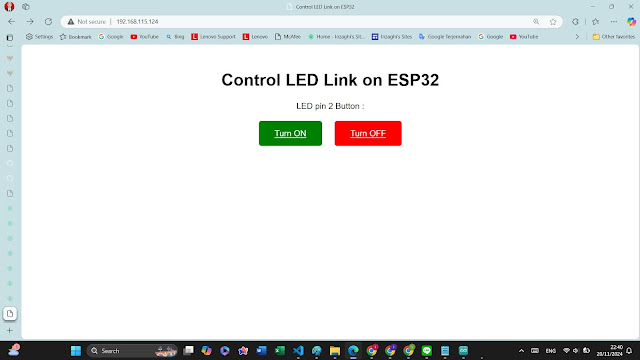
Output :
2. Tampilan Bagus (Dengan HTML dan CSS)
Untuk menggunakan sedikit GUI dengan HTML dan CSS, bukalah Arduino IDE dan inilah Kode Programnya :
#include <WiFi.h>const char* ssid = "Nama Wi-Fi Anda";const char* password = "Password Wi-Fi Anda";WiFiServer server(80);String currentLine = ""; // Define currentLine as a Stringvoid setup() {Serial.begin(115200);pinMode(2, OUTPUT); // LED pinSerial.print("Connecting to ");Serial.println(ssid);WiFi.begin(ssid, password);while (WiFi.status() != WL_CONNECTED) {delay(500);Serial.print(".");}Serial.println("\nConnected");Serial.print("IP Address: ");Serial.println(WiFi.localIP());server.begin();}void loop() {WiFiClient client = server.available(); // Check if there is a client connectedif (client) {Serial.println("New Client Connected");currentLine = ""; // Clear the current line before starting to read from the clientwhile (client.connected()) {if (client.available()) {char c = client.read(); // Read the next character from the clientSerial.write(c);if (c == '\n') {if (currentLine.length() == 0) {// Send an HTML responseclient.println("HTTP/1.1 200 OK");client.println("Content-Type: text/html");client.println("Connection: close");client.println();client.println("<!DOCTYPE html>");client.println("<html lang=\"en\">");client.println("<head>");client.println("<meta charset=\"UTF-8\">");client.println("<meta name=\"viewport\" content=\"width=device-width, initial-scale=1.0\">");client.println("<link rel=\"icon\" href=\"data:,\">");client.println("<style>");client.println("body { font-family: Arial, sans-serif; text-align: center; margin-top: 50px; }");client.println(".button { padding: 15px 30px; font-size: 16px; border: none; border-radius: 5px; cursor: pointer; margin: 10px; }");client.println(".on { background-color: green; color: white; }");client.println(".off { background-color: red; color: white; }");client.println("</style>");client.println("<title>Control LED Link on ESP32</title>");client.println("</head>");client.println("<body>");client.println("<h1>Control LED Link on ESP32</h1>");client.println("<p>LED pin 2 Button :</p>");client.println("<br>");client.println("<a href=\"/H\" class=\"button on\">Turn ON</a>");client.println("<a href=\"/L\" class=\"button off\">Turn OFF</a>");client.println("</body>");client.println("</html>");break;} else {currentLine = ""; // Clear the current line for the next request}} else if (c != '\r') {currentLine += c;}// Check if the client has requested to turn the LED ONif (currentLine.endsWith("GET /H")) {digitalWrite(2, HIGH);}// Check if the client has requested to turn the LED OFFif (currentLine.endsWith("GET /L")) {digitalWrite(2, LOW);}}}// Close the connectionclient.stop();Serial.println("Client Disconnected");}}
Atau ini :
#include <WiFi.h>const char* ssid = "Nama Wi-Fi Anda";const char* password = "Password Wi-Fi Anda";WiFiServer server(80);String currentLine = ""; // Define currentLine as a String// Function to generate HTML HeaderString generateHTML() {String html = "<!DOCTYPE html>";html += "<html lang=\"en\">";html += "<head>";html += "<meta charset=\"UTF-8\">";html += "<meta name=\"viewport\" content=\"width=device-width, initial-scale=1.0\">";html += "<link rel=\"icon\" href=\"data:,\">";html += "<style>";html += "body { font-family: Arial, sans-serif; text-align: center; margin-top: 50px; }";html += ".button { padding: 15px 30px; font-size: 16px; border: none; border-radius: 5px; cursor: pointer; margin: 10px; }";html += ".on { background-color: green; color: white; }";html += ".off { background-color: red; color: white; }";html += "</style>";html += "<title>Control LED Link on ESP32</title>";html += "</head>";html += "<body>";html += "<h1>Control LED Link on ESP32</h1>";html += "<p>LED pin 2 Button :</p>";html += "<br>";html += "<a href=\"/H\" class=\"button on\">Turn ON</a>";html += "<a href=\"/L\" class=\"button off\">Turn OFF</a>";html += "</body>";html += "</html>";return html;}void setup() {Serial.begin(115200);pinMode(2, OUTPUT); // LED pinSerial.print("Connecting to ");Serial.println(ssid);WiFi.begin(ssid, password);while (WiFi.status() != WL_CONNECTED) {delay(500);Serial.print(".");}Serial.println("\nConnected");Serial.print("IP Address: ");Serial.println(WiFi.localIP());server.begin();}void loop() {WiFiClient client = server.available(); // Check if there is a client connectedif (client) {Serial.println("New Client Connected");currentLine = ""; // Clear the current line before starting to read from the clientwhile (client.connected()) {if (client.available()) {char c = client.read(); // Read the next character from the clientSerial.write(c);if (c == '\n') {if (currentLine.length() == 0) {// Send the HTTP response with the HTML headerclient.println("HTTP/1.1 200 OK");client.println("Content-Type: text/html");client.println("Connection: close");client.println();client.print(generateHTML());break;} else {currentLine = ""; // Clear the current line for the next request}} else if (c != '\r') {currentLine += c;}// Check if the client has requested to turn the LED ONif (currentLine.endsWith("GET /H")) {digitalWrite(2, HIGH);}// Check if the client has requested to turn the LED OFFif (currentLine.endsWith("GET /L")) {digitalWrite(2, LOW);}}}// Close the connectionclient.stop();Serial.println("Client Disconnected");}}
Atau yang ini :
#include <WiFi.h>const char* ssid = "Nama Wi-Fi Anda";const char* password = "Password Wi-Fi Anda";WiFiServer server(80);String currentLine = ""; // Define currentLine as a Stringvoid setup() {Serial.begin(115200);pinMode(2, OUTPUT); // LED pinSerial.print("Connecting to ");Serial.println(ssid);WiFi.begin(ssid, password);while (WiFi.status() != WL_CONNECTED) {delay(500);Serial.print(".");}Serial.println("\nConnected");Serial.print("IP Address: ");Serial.println(WiFi.localIP());server.begin();}void loop() {WiFiClient client = server.available(); // Check if there is a client connectedif (client) {Serial.println("New Client Connected");currentLine = ""; // Clear the current line before starting to read from the clientwhile (client.connected()) {if (client.available()) {char c = client.read(); // Read the next character from the clientSerial.write(c);if (c == '\n') {if (currentLine.length() == 0) {// HTML response as a single stringString htmlPage = R"rawliteral(<!DOCTYPE html><html lang="en"><head><meta charset="UTF-8"><meta name="viewport" content="width=device-width, initial-scale=1.0"><link rel="icon" href="data:,"><style>body { font-family: Arial, sans-serif; text-align: center; margin-top: 50px; }.button { padding: 15px 30px; font-size: 16px; border: none; border-radius: 5px; cursor: pointer; margin: 10px; }.on { background-color: green; color: white; }.off { background-color: red; color: white; }</style><title>Control LED Link on ESP32</title></head><body><h1>Control LED Link on ESP32</h1><p>LED pin 2 Button :</p><br><a href="/H" class="button on">Turn ON</a><a href="/L" class="button off">Turn OFF</a></body></html>)rawliteral";// Send HTTP responseclient.println("HTTP/1.1 200 OK");client.println("Content-Type: text/html");client.println("Connection: close");client.println();client.print(htmlPage);break;} else {currentLine = ""; // Clear the current line for the next request}} else if (c != '\r') {currentLine += c;}// Check if the client has requested to turn the LED ONif (currentLine.endsWith("GET /H")) {digitalWrite(2, HIGH);}// Check if the client has requested to turn the LED OFFif (currentLine.endsWith("GET /L")) {digitalWrite(2, LOW);}}}// Close the connectionclient.stop();Serial.println("Client Disconnected");}}
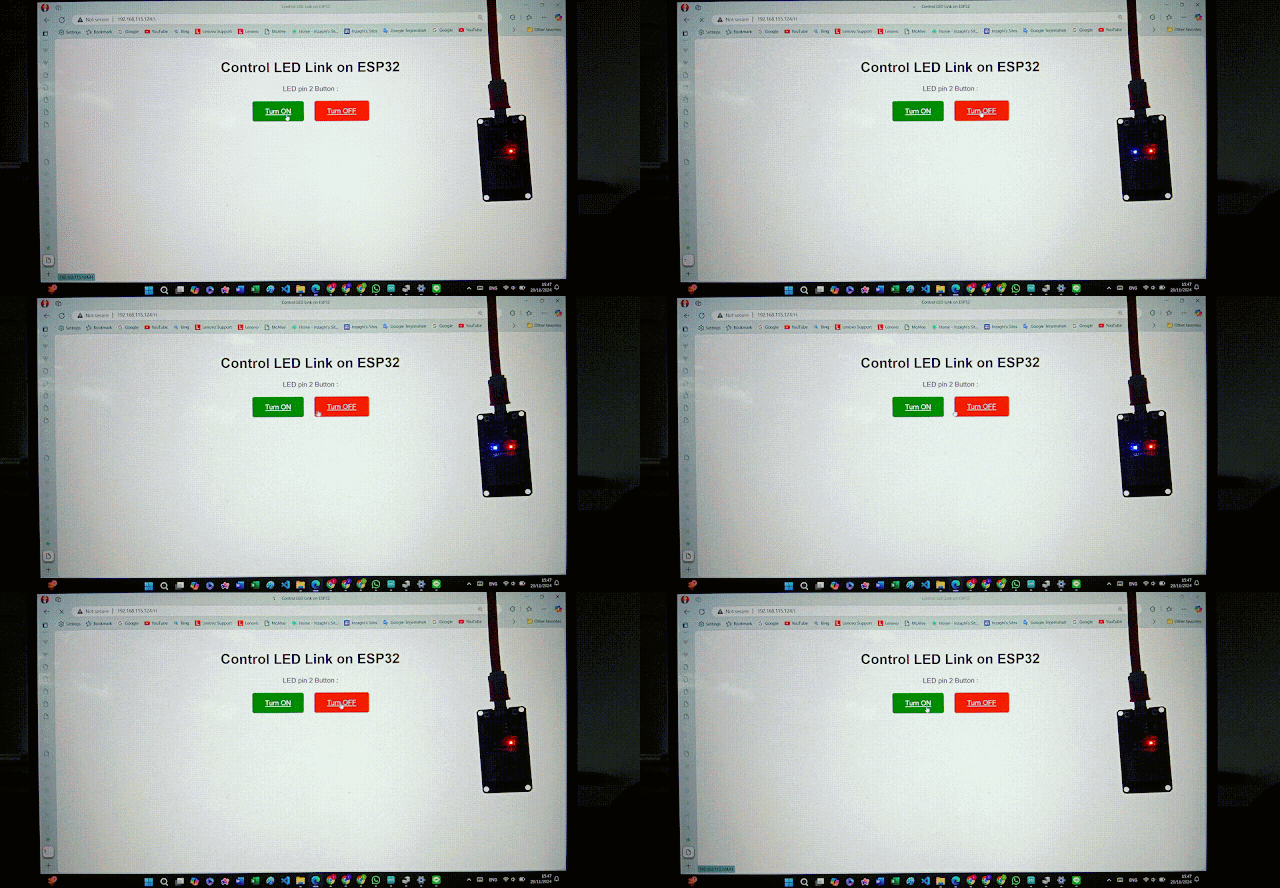
Output :
Keterangan :
- Masukkanlah terlebih dahulu menggunakan IP Address yang tertera pada Serial Monitor di Arduino IDE.
Agar lebih jelasnya, silakan Tontonlah Video ini di YouTube :
Mohon maaf apabila ada kesalahan sedikit pun pada Kode Program ini.
Terima Kasih 😀😊😘👌👍 :)

.png)
.jpg)
.gif)
.jpg)
.gif)
